As an Amazon Associate, we earn from qualifying purchases. Some links may be affiliate links at no extra cost to you. Although our opinions are based on curated research, we haven't used these products. Articles generated with AI.
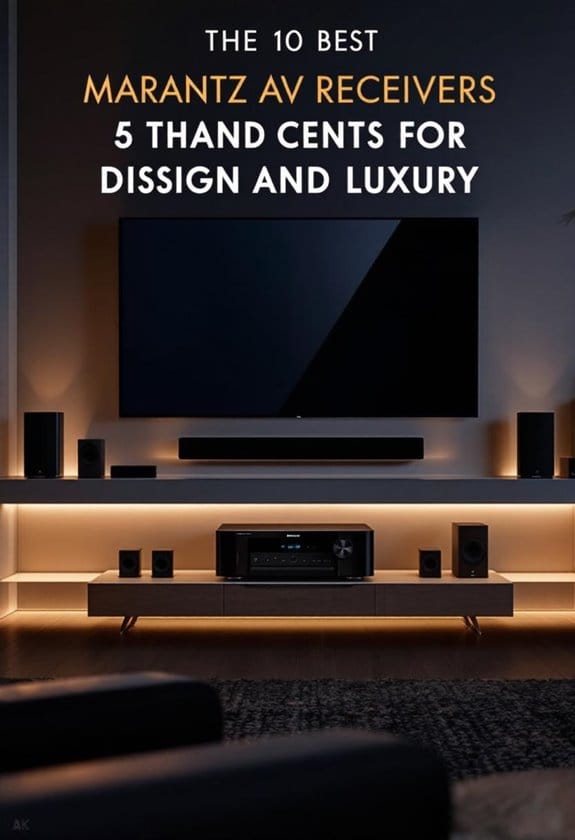
10 Whole House Audio Systems That Turn Every Room Into a Concert Hall
Quick Guide
- OEM MS‑21: In‑wall, 10.1″ touchscreen, Android, Google Home, 32 GB storage, UL/CSA, 3‑yr warranty.
- Avantree A1: 20 W, Bluetooth/Auracast, optical/AUX, 100 m range, rechargeable, auto‑off.
- Avantree A2: 21 cm speakers, <30 ms latency, no app, water‑resistant, 6.27 lb, 3.9‑star rating.
- Juke‑6: 6‑zone, 12‑channel, 40 W/chan, AirPlay 2, Spotify Connect, DLNA, Party Mode.
- Dayton DAX66: 6‑zone, 25 WPC, bridgeable 100 W, RS‑232, IR repeater.
- WS66i: 6‑zone, 100 W/zone, dual streamers, expand to 18 zones, Ethernet.
- Pyle Receiver: 800 W peak, 4‑channel, Bluetooth 5.0, karaoke mic, multiple inputs.
- OSD Nero Max12: 12‑channel, 80 W/chan, app control, RS‑232 optional.
- Considerations: Match impedance (4–8 Ω), ensure Wi‑Fi/Bluetooth coverage, verify power supply, use app menus or RS‑232 for zone setup.
- Next steps: Follow the installation checklist to configure each zone and test playback across rooms.
Key Takeaways
- Choose multi‑room systems with dedicated amplifiers (e.g., 6‑zone Juke‑6, Dayton DAX66) for independent volume and source control in each room.
- Prioritize speakers that support high‑power output (20 W‑2000 W) and low‑impedance (4‑8 Ω) to fill large spaces with clear, balanced sound.
- Opt for wireless connectivity (Wi‑Fi, Bluetooth, AirPlay 2, DLNA) and app‑based zone management for seamless streaming and easy expansion.
- Ensure the system includes versatile inputs (RCA, HDMI, optical, USB, AUX) to integrate TV, music services, and voice assistants.
- Look for durable, water‑resistant speaker housings and built‑in power‑saving features (auto‑off, battery backup) for reliable, long‑term performance.
| OEM Systems MS-21 In-Wall Entertainment System White |  | Seamless Integration | Power Output (per channel/zone): 25 W per channel | Number of Zones/Channels: 4 speaker pairs (8 ch) | Connectivity Options: Wi‑Fi, Bluetooth, AM/FM, USB, RCA, AUX, micro‑SD | VIEW LATEST PRICE | Read Our Analysis |
| Avantree Harmony A1 Multi-Room Wireless Speaker (100m) | Multi‑Room Flexibility | Power Output (per channel/zone): 20 W max per speaker | Number of Zones/Channels: Multi‑room (up to 100 m) | Connectivity Options: Bluetooth, Optical, AUX, Auracast wireless | VIEW LATEST PRICE | Read Our Analysis | |
| Avantree Harmony 2 Multi-Room Wireless Speaker System |  | Low‑Latency Sync | Power Output (per channel/zone): 15 W per speaker | Number of Zones/Channels: 3 speakers (single zone) | Connectivity Options: Bluetooth, Optical, AUX, line‑level input | VIEW LATEST PRICE | Read Our Analysis |
| Juke-6 6-Zone Wireless Audio Amplifier with AirPlay2 Spotify Bluetooth DLNA |  | Zone‑Rich Power | Power Output (per channel/zone): 40 W per channel into 8 Ω | Number of Zones/Channels: 6 zones (12 ch) | Connectivity Options: AirPlay 2, Spotify Connect, Bluetooth, DLNA, Ethernet | VIEW LATEST PRICE | Read Our Analysis |
| Dayton Audio DAX66 6‑Zone Whole‑House Audio System |  | Scalable Whole‑House | Power Output (per channel/zone): 25 W per channel (12 ch) | Number of Zones/Channels: 6 zones (12 ch) | Connectivity Options: IR, RS232, 12 V IR components, RCA inputs | VIEW LATEST PRICE | Read Our Analysis |
| HiPulse N512 5.1.2 Virtual Surround Sound System | 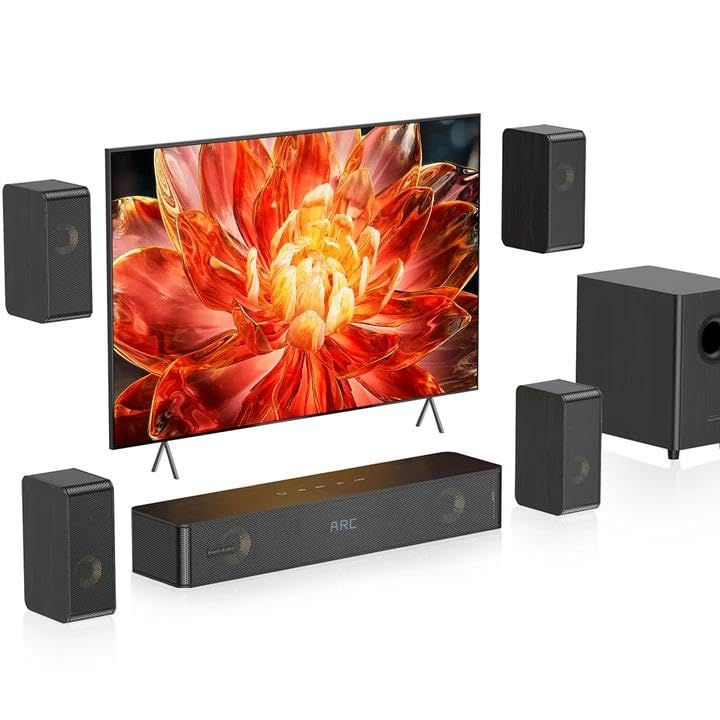 | Immersive Surround | Power Output (per channel/zone): 400 W peak (system) | Number of Zones/Channels: 5.1.2 (7 ch) | Connectivity Options: HDMI ARC, Optical, AUX, USB, Bluetooth 5.3 | VIEW LATEST PRICE | Read Our Analysis |
| Vaiyer 2000W Bluetooth Audio System with Ceiling Speakers | 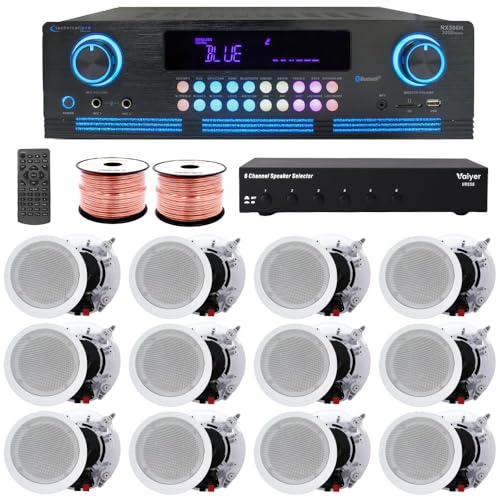 | High‑Power Theater | Power Output (per channel/zone): 175 W per ceiling speaker (total 2100 W) | Number of Zones/Channels: 6‑channel selector (6 zones) | Connectivity Options: Bluetooth, RCA, USB, HDMI, SD card, AUX | VIEW LATEST PRICE | Read Our Analysis |
| WS66i 6‑Zone Whole‑House Amplifier 100W per Zone | 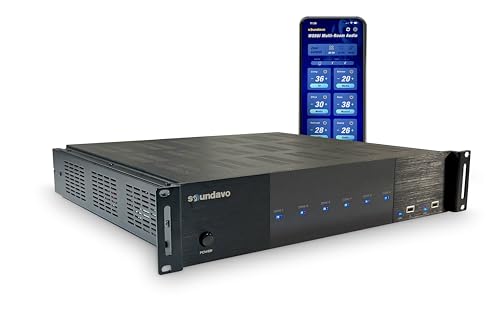 | App‑Controlled Zones | Power Output (per channel/zone): 100 W per zone | Number of Zones/Channels: 6 zones (12 ch) | Connectivity Options: Wi‑Fi/Ethernet, RCA, 3.5 mm, Optical, USB, AirPlay 2, Spotify | VIEW LATEST PRICE | Read Our Analysis |
| Pyle Home Stereo Receiver with Bluetooth 800W Karaoke Ready | 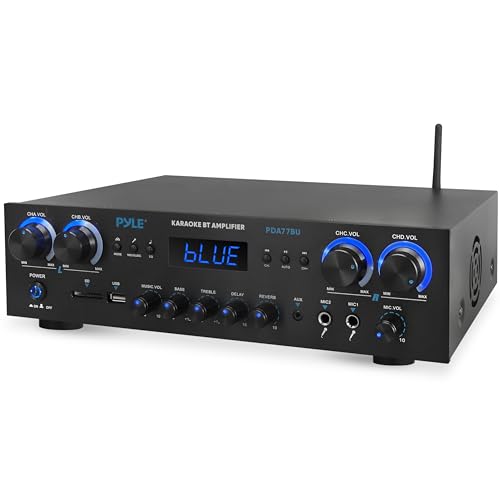 | Karaoke‑Ready Fun | Power Output (per channel/zone): 800 W peak (system) | Number of Zones/Channels: 4‑channel (single zone) | Connectivity Options: Bluetooth 5.0, USB, SD, FM, AUX, RCA | VIEW LATEST PRICE | Read Our Analysis |
| OSD Audio Nero Max12 6‑Zone Amplifier with App Control | 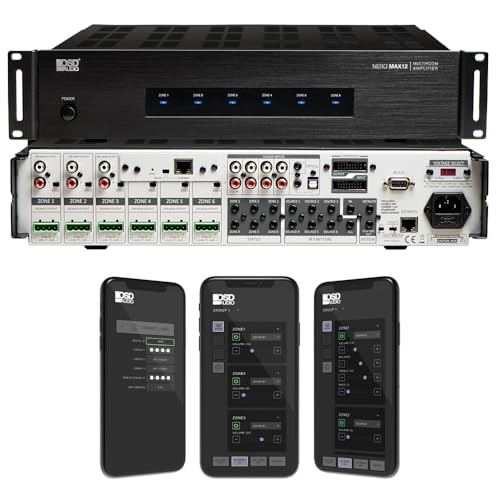 | Smart Home Audio | Power Output (per channel/zone): 80 W per channel at 4 Ω | Number of Zones/Channels: 6 zones (12 ch) | Connectivity Options: Wi‑Fi/Ethernet, RCA, Aux, Optical, RS232, App control | VIEW LATEST PRICE | Read Our Analysis |
More Details on Our Top Picks
OEM Systems MS-21 In-Wall Entertainment System White
– Target user: Homeowners who want a built‑in, multi‑room audio hub that integrates with smart‑home devices and supports up to four speaker pairs.
OEM Systems MS‑21 In‑Wall Entertainment System White
- Installation
- Cut wall opening 13‑½” W × 6½”” H × 2½” D, mount unit with included housing, connect wiring harness, secure faceplate.
- Use torx driver, screws, and connectors from kit; ensure stud spacing 16” on‑center.
- Core Features
- 10.1‑inch HD touchscreen (1024 × 600) runs Android OS, lets you download apps from Google Play, and works with Google Home.
- Built‑in 25 W per channel audio drives up to four speaker pairs, supports dual stereo outputs.
- Connectivity
- Connect Wi‑Fi, Bluetooth, AM/FM radio, USB, micro‑SD, AV Aux, RCA I/O, GPS antenna, and external antenna.
- Use Google Home app to control audio, smart‑home devices, and view security camera feeds.
- Technical Specs
- Power: AC 120 / 240 V, DC 12‑15 V, 7 A peak fuse, auto‑select PSU 100‑277 VAC.
- Storage: 32 GB internal, expandable via USB or micro‑SD.
- Dimensions: 17‑7/8” W × 7‑3/8” H × 2‑3/8” D; weight ~10.13 lb.
- Warranty & Certification
- UL/CSA listed, 3‑year limited warranty.
Follow each step, verify connections, then power on to access the touchscreen menu, select “Audio Settings,” and assign speaker pairs to desired rooms.
- Power Output (per channel/zone):25 W per channel
- Number of Zones/Channels:4 speaker pairs (8 ch)
- Connectivity Options:Wi‑Fi, Bluetooth, AM/FM, USB, RCA, AUX, micro‑SD
- App / Smart Control:Google Home compatibility (voice)
- Speaker Compatibility (Passive):Up to 4 speaker pairs (passive)
- Installation Form Factor:In‑wall, flush‑mount panel
- Additional Feature:Android OS with Google Play
- Additional Feature:Built‑in 25 W speaker pairs
- Additional Feature:UL/CSA certified safety
Avantree Harmony A1 Multi-Room Wireless Speaker (100m)
Product Overview
- Avantree Harmony A1 is an Auracast multi‑room wireless speaker system.
- Each unit delivers 20 W via a dynamic driver, supports Bluetooth, optical, and AUX inputs, and includes a touch control panel.
Installation & Expansion
- Place the transmitter within 100 m of the first speaker; distance may vary with walls.
- Add additional speakers by plugging their charging cables, then select “Add Device” in the Harmony app.
Connectivity
- Pair phones, tablets, or laptops via Bluetooth, or connect a TV using the supplied optical or 3.5 mm AUX cable.
- Set the source volume to maximum for consistent output across all units.
Power & Durability
- Speakers run on three built‑in lithium‑ion batteries, charge via the included charger.
- They power off after one hour of inactivity unless you update the firmware to disable the timer.
Use Cases
- Ideal for living rooms, kitchens, home offices, or small conference rooms.
- Not recommended for outdoor or large open spaces due to volume limits and environmental factors.
What’s Included
– Three Harmony A1 speakers, transmitter, optical cable, AUX cable, power charger, and charging cables.
Follow these steps, and you’ll achieve synchronized indoor audio without complex wiring.
- Power Output (per channel/zone):20 W max per speaker
- Number of Zones/Channels:Multi‑room (up to 100 m)
- Connectivity Options:Bluetooth, Optical, AUX, Auracast wireless
- App / Smart Control:No dedicated app (touch control)
- Speaker Compatibility (Passive):Passive speakers (wireless sync)
- Installation Form Factor:Freestanding tabletop speaker
- Additional Feature:Auracast synchronized audio
- Additional Feature:100 m wireless range
- Additional Feature:Water‑resistant housing
Avantree Harmony 2 Multi-Room Wireless Speaker System
– Target audience: If you need synchronized background music, TV audio, or spoken content across several indoor rooms, the Harmony 2 is designed for homes, classrooms, offices, and meeting rooms that require consistent playback without large‑venue power.
Overview
You connect the transmitter to a TV, phone, or laptop via optical, AUX, or Bluetooth, then place the three 21 cm speakers where you want sound. The system uses a dynamic driver, stereo output, and 15 W power per speaker, covering 20 kHz frequency response.
Setup
- Plug the transmitter into a line‑level source (3.5 mm TRS or RCA).
- Connect each speaker to the transmitter using the supplied cables.
- Power the transmitter and speakers with the included cords and CR5 batteries.
Performance
- Ultra‑low latency stays under 30 ms, keeping audio in sync across rooms.
- No app is required; the system auto‑connects after power‑on.
Specs
- Weight: 6.27 lb; dimensions: 12.2″ × 4.33″ × 11.81″.
- Plastic housing, water‑resistant, lanyard mount.
Rating
– 3.9 / 5 stars from 154 reviews; limited warranty via product page.
You follow these steps to achieve consistent indoor audio without large‑venue power.
- Power Output (per channel/zone):15 W per speaker
- Number of Zones/Channels:3 speakers (single zone)
- Connectivity Options:Bluetooth, Optical, AUX, line‑level input
- App / Smart Control:No app (auto‑connect)
- Speaker Compatibility (Passive):Passive speakers (wired)
- Installation Form Factor:Freestanding tabletop speaker
- Additional Feature:Ultra‑low latency <30 ms
- Additional Feature:No‑app setup required
- Additional Feature:21 cm driver size
Juke-6 6-Zone Wireless Audio Amplifier with AirPlay2 Spotify Bluetooth DLNA
Identify the Juke‑6 as a 6‑zone, 12‑channel amplifier that delivers 40 W per channel into 8 Ω, stable down to 2 Ω, making it suitable for whole‑house audio where each room needs independent volume control.
Setup Overview
- Connect the 12 V DC power adapter to the tabletop unit (15×8×3 in, 6.5 lb).
- Use speaker wire to link passive in‑ceiling, in‑wall, or landscape speakers to each channel, respecting the 2 Ω stability limit.
Network Configuration
- Open the Juke app, tap Add Zone, select Wi‑Fi network, and assign a zone name.
- Repeat for up to six zones, then enable AirPlay 2, Spotify Connect, Bluetooth, and DLNA in Settings → Streaming.
Streaming Controls
- In AirPlay 2, choose a zone from the list, then select a source device (iPhone, iPad, Mac).
- For Spotify, open the app, tap Devices Available, and pick the desired Juke‑6 zone.
Multi‑Zone Operation
- Activate Party Mode to broadcast a single source to all zones simultaneously.
- Adjust each room’s volume independently using the app or the TV remote when an AppleTV adapter supplies TV audio.
Expansion
– Link additional Juke units via Wi‑Fi, then use Add Unit in the app to increase zones beyond six.
Maintenance
- Update firmware through the app’s System → Update menu.
- Contact support via website, email, or phone for troubleshooting.
- Power Output (per channel/zone):40 W per channel into 8 Ω
- Number of Zones/Channels:6 zones (12 ch)
- Connectivity Options:AirPlay 2, Spotify Connect, Bluetooth, DLNA, Ethernet
- App / Smart Control:Mobile app for zone management
- Speaker Compatibility (Passive):Passive in‑ceiling/in‑wall speakers
- Installation Form Factor:Tabletop amplifier (mountable)
- Additional Feature:AirPlay 2 multi‑room streaming
- Additional Feature:40 W per channel output
- Additional Feature:Tabletop mounting design
Dayton Audio DAX66 6‑Zone Whole‑House Audio System
The DAX66 supplies six independent source inputs and six zone outputs, making it ideal for homeowners who want separate music control in each room.
Key Features
- Class D amplifier, 25 WPC at 8 Ω, bridgeable to 100 W per channel, up to six channels.
- Six source inputs, six zone outputs, expandable to 18 zones via RS‑232.
- IR repeater built‑in, supports 12 V IR components, remote control from any zone.
Installation Steps
- Mount the 22 × 22 × 9 in unit on a wall, secure with brackets, and connect speakers to the 12 channels.
- Connect source devices to the six inputs, then label each input for easy selection.
- Link the RS‑232 port to your automation controller, configure zone IDs, and test communication.
Operation
- Use the keypad or IR remote to select a source, then press a zone button to route audio.
- For automation, send commands such as “ZONE 1 PLAY SOURCE A” via RS‑232.
Specifications
- Weight: 32.6 lb, black satellite housing.
- Warranty: manufacturer‑provided, see product page.
- Rating: 3.7/5 stars, 14 reviews, best‑seller rank #80,348 in electronics.
- Power Output (per channel/zone):25 W per channel (12 ch)
- Number of Zones/Channels:6 zones (12 ch)
- Connectivity Options:IR, RS232, 12 V IR components, RCA inputs
- App / Smart Control:IR remote, optional keypad, RS232 integration
- Speaker Compatibility (Passive):Passive ceiling/in‑wall speakers
- Installation Form Factor:Rack‑mount/stand‑alone amplifier
- Additional Feature:Built‑in IR repeater
- Additional Feature:RS232 automation interface
- Additional Feature:Bridgeable 100 W outputs
HiPulse N512 5.1.2 Virtual Surround Sound System
If you need a whole‑house audio solution that delivers cinema‑grade sound without requiring Dolby Atmos or DTS licensing, the HiPulse N512 fits that requirement.
Key Features
- Wooden cabinet, aluminum‑magnesium drivers, 11 drivers total
- 400 W peak power, 5.25″ down‑firing subwoofer, 4 wired rear surrounds
- Discrete Spatial Expansion Tech, two upward‑firing drivers
Setup Steps
- Connect HDMI ARC or Optical cable to the main unit.
- Plug the four surround speakers into the single rear cable.
- Power on, select source via remote (ARC/OPT/BT/AUX).
EQ and Controls
- Press “Mode” to cycle Movie, Music, NEWS, Game.
- Adjust bass (‑6 to +6 dB), treble, and rear volume with arrow keys.
- Activate Night Mode or turn off LED display in Settings.
Placement
– Mount main unit on a tabletop or wall; keep subwoofer floor‑standing for optimal bass.
Specifications
- Dimensions: 4.3″ × 2.6″ × 5.8″; Weight: 6.5 kg.
- Connectivity: HDMI ARC, Optical, AUX, USB, Bluetooth 5.3.
Follow these instructions to achieve stable, cinema‑grade performance across your home.
- Power Output (per channel/zone):400 W peak (system)
- Number of Zones/Channels:5.1.2 (7 ch)
- Connectivity Options:HDMI ARC, Optical, AUX, USB, Bluetooth 5.3
- App / Smart Control:Remote control, LED display, no app
- Speaker Compatibility (Passive):Built‑in speakers + passive rear surrounds
- Installation Form Factor:Floor‑standing or wall‑mount unit
- Additional Feature:Up‑firing drivers for height channel
- Additional Feature:Discrete Spatial Expansion Tech
- Additional Feature:HDMI ARC compatibility
Vaiyer 2000W Bluetooth Audio System with Ceiling Speakers
You’re looking for a system that can power multiple rooms with consistent, high‑fidelity sound while staying within a single cabinet, and the Vaiyer 2000W kit delivers exactly that.
Key Components
- 2000 W Bluetooth amplifier with digital spectrum display, RCA, USB, SD, AUX, HDMI inputs
- Twelve 5.25″ ceiling speakers, 175 W each, titanium dome tweeter, 80 Hz‑20 kHz response
- Six‑channel speaker selector, 900 W max, impedance protection, metal housing
- 500 ft speaker wire, remote control, 49 lb total weight
Installation Steps
- Mount each speaker in the ceiling, align the perforated grille, connect wire to the selector’s spring‑loaded terminals.
- Run the 500 ft wire to the amplifier, secure connections, ensure 8 Ω impedance per channel.
- Power the amplifier, use the Bluetooth menu to pair devices, select input source via RCA/USB/HDMI as needed.
- Adjust bass, treble, balance on the digital display, then test each room through the selector’s independent controls.
Performance Notes
- Total power handling reaches 2100 W, delivering balanced sound across movies, music, and background audio.
- The electronic crossover network optimizes frequency distribution for each speaker pair.
Follow these steps to achieve a whole‑house audio setup that meets technical specifications without excess.
- Power Output (per channel/zone):175 W per ceiling speaker (total 2100 W)
- Number of Zones/Channels:6‑channel selector (6 zones)
- Connectivity Options:Bluetooth, RCA, USB, HDMI, SD card, AUX
- App / Smart Control:Remote control, Bluetooth app (optional)
- Speaker Compatibility (Passive):5.25 ” ceiling speakers (passive)
- Installation Form Factor:Ceiling‑mount speakers, floor‑standing amp
- Additional Feature:2000 W Bluetooth amplifier
- Additional Feature:12 ceiling speakers included
- Additional Feature:6‑channel speaker selector
WS66i 6‑Zone Whole‑House Amplifier 100W per Zone
WS66i 6‑Zone Whole‑House Amplifier Overview
You install the WS66i to power six ceiling‑speaker zones, each delivering 100 W. The unit accepts six source inputs—TV, streamer, media player, DAC, USB, or Ethernet—and routes them to any zone independently. Use the mobile app to select source, adjust volume, or synchronize playback across zones.
Key Features
- Whole‑home audio: independent or unified music per zone
- Dual built‑in streamers: AirPlay, Spotify Connect, DLNA, USB
- Expandable to 18 zones by linking additional WS66i units
Installation Steps
- Mount the black chassis (19 × 17 × 3.5 in) on a wall, connect power.
- Attach ceiling speakers using RCA, 3.5 mm, or optical inputs.
- Link sources via Ethernet or RCA cables.
- Open the app, tap “Add Zone,” assign a name, and set volume.
Technical Specs
- Output: 6‑channel stereo/mono, 100 W per zone
- Connectivity: Ethernet, RCA, 3.5 mm, Optical, USB‑A, RJ45
- Weight: 31.7 lb, warranty available.
- Power Output (per channel/zone):100 W per zone
- Number of Zones/Channels:6 zones (12 ch)
- Connectivity Options:Wi‑Fi/Ethernet, RCA, 3.5 mm, Optical, USB, AirPlay 2, Spotify
- App / Smart Control:Mobile app (Soundavo)
- Speaker Compatibility (Passive):Passive ceiling/in‑wall speakers
- Installation Form Factor:Tabletop/desktop amplifier
- Additional Feature:Dual built‑in streamers (AirPlay, Spotify)
- Additional Feature:App‑controlled zone volumes
- Additional Feature:Expandable to 18 zones
Pyle Home Stereo Receiver with Bluetooth 800W Karaoke Ready
Target audience: Homeowners who want a single, 800W‑peak‑power amp that can feed multiple rooms, support Bluetooth 5.0 streaming, and host karaoke events without additional equipment.
Key Specifications
- Power: 800 W peak, 4‑channel amplifier, delivers dynamic sound for movies, music, and games.
- Connectivity: Bluetooth 5.0 (30 ft range), USB‑A MP3 playback, SD card slot, FM radio, AUX, RCA, 3.5 mm inputs.
- Karaoke: Dual 1/4‑inch microphone jacks, independent volume and echo controls.
Setup Steps
- Power On – Plug receiver into AC, press the front‑panel power button.
- Bluetooth Pairing – Hold the Bluetooth icon until LED flashes, select “Pyle‑Bluetooth” on your phone, confirm pairing.
- Mic Connection – Insert microphone plugs into Mic 1 and Mic 2, adjust gain knobs as needed.
- Source Selection – Press “Source” button, choose USB, SD, FM, or AUX; navigate menus using the digital LED display.
Usage Tips
- Use the LED display to monitor input level and battery status.
- Route audio to multiple rooms via RCA out connectors; connect to wall‑mounted speakers for whole‑house coverage.
- Enable karaoke mode by pressing the “Karaoke” button, then adjust echo and volume for each mic independently.
Warranty: Manufacturer’s Warranty available through Pyle customer service.
- Power Output (per channel/zone):800 W peak (system)
- Number of Zones/Channels:4‑channel (single zone)
- Connectivity Options:Bluetooth 5.0, USB, SD, FM, AUX, RCA
- App / Smart Control:Front‑panel LED, no app
- Speaker Compatibility (Passive):Passive 4‑channel speaker system
- Installation Form Factor:Floor‑standing receiver
- Additional Feature:Karaoke‑ready mic inputs
- Additional Feature:800 W peak power
- Additional Feature:Front‑panel digital LED display
OSD Audio Nero Max12 6‑Zone Amplifier with App Control
Key Features
- 12‑channel amplifier, six stereo zones, 80 W per channel at 4 Ω.
- Four RCA, two AUX, one optical inputs per zone.
- App control via OSD Control (iOS/Android): select source, adjust volume, power on/off.
- RS‑232 for smart‑home integration, optional in‑wall keypads.
Setup Steps
- Mount MAX12, connect speakers to designated zone terminals.
- Plug power, link RCA/AUX/optical sources, configure RS‑232 if needed.
- Install OSD Control app, create zones, assign inputs, set volume limits.
- Test each zone, adjust balance, expand to up to 18 zones later.
Specifications
- Dimensions: 22 × 21.5 × 9 in; weight: 31.3 lb.
- Warranty and model info available online.
Follow these instructions to achieve independent, app‑driven audio across six rooms.
- Power Output (per channel/zone):80 W per channel at 4 Ω
- Number of Zones/Channels:6 zones (12 ch)
- Connectivity Options:Wi‑Fi/Ethernet, RCA, Aux, Optical, RS232, App control
- App / Smart Control:OSD Control App (iOS/Android)
- Speaker Compatibility (Passive):Passive ceiling/in‑wall speakers
- Installation Form Factor:Rack‑mount/stand‑alone amplifier
- Additional Feature:RS232 smart‑home integration
- Additional Feature:Optional in‑wall keypads
- Additional Feature:4‑driver speaker support
Factors to Consider When Choosing a Whole House Audio System
- Check coverage compatibility, ensuring each speaker matches the system’s frequency response, impedance (4–8 Ω), and wireless protocol (Wi‑Fi, Bluetooth, or Zigbee).
- Verify power requirements, confirming the amplifier’s RMS wattage (e.g., 150 W per channel) exceeds the total speaker load and that your circuit breaker can handle the peak demand.
- Assess installation flexibility, looking for modular back‑boxes, wall‑mount kits, and pre‑wired conduit options that let you route cables without major renovations.
You should prioritize multi‑room control by configuring the app’s zone settings, assigning each room a unique identifier, and enabling synchronized playback or independent sources.
When selecting source input variety, make sure the receiver supports HDMI ARC, optical TOSLINK, RCA, and USB‑C, and that you can switch inputs via the touchscreen menu or voice command.
Coverage Compatibility
– Zone count: Check how many zones the system supports; typical kits range from 6 to 18 zones, allowing independent playback in each room.
Compatibility Checklist
- Wireless range: Verify transmitter‑to‑speaker distance; most kits cover 30–100 m, so measure hallway lengths and wall thickness.
- Speaker types: Confirm support for in‑ceiling, in‑wall, and satellite speakers; look for “speaker‑type compatibility” in the manual.
- Input options: Ensure the hub accepts AirPlay 2, Bluetooth, AUX, Optical, and RS232; select the appropriate input from the Settings → Inputs menu.
- Expandability: Choose models that allow linking additional hubs; use the “Add Zone” function in the app to extend coverage.
- Environment: Verify indoor‑only design; avoid placing units near windows or metal structures that could degrade signal uniformity.
Follow these steps to match system coverage with your home layout.
Power Requirements
– Determine total wattage: Add each zone’s per‑channel rating (e.g., 25 W per channel for MS‑21, 100 W per zone for WS66i) and multiply by the number of active zones to see if the system can handle peak loads such as 800 W (Pyle PDA77BU) or 2100 W (Vaiyer kit).
Power Sources
- 12 V DC (MS‑21) – use a regulated supply, check polarity.
- 120 V/240 V AC – auto‑select PSU, verify voltage rating on back panel.
- Integrated mains – confirm fuse rating matches amp’s draw.
Amplifier Configuration
- Multi‑channel amps (6‑12 channels) let you assign zones individually.
- Bridging doubles channel output; DAX66 reaches 100 W per channel when bridged.
- Ensure each zone’s speaker impedance matches amp’s load (4‑8 Ω).
Energy Management
- Enable auto‑off after inactivity (Harmony A1) to reduce standby draw.
- Use zone‑specific volume controls to limit power consumption per room.
Installation Checks
- Verify wiring gauge supports total current.
- Confirm grounding for safety.
Follow these steps to match system wattage to your house’s audio demand.
Installation Flexibility
When you move from power planning to physical setup, start by checking each system’s mounting options, noting whether it supports tabletop, wall‑mount, or in‑ceiling/in‑wall installation, and record the required cut‑out dimensions and enclosure depth for a flush or recessed fit.
Mounting Compatibility
- Verify the processor matches the chosen method (tabletop, wall‑mount, in‑ceiling).
- Confirm cut‑out size fits standard 2×4 stud walls and faceplates.
Control Integration
- Look for built‑in IR repeaters, RS232 ports, or Control4/house‑automation interfaces.
- Ensure they connect to your existing control panel during installation.
Power & Voltage
- Check AC 120V/240V support, auto‑switching PSU, and physical dimensions.
- Match these specs to your electrical infrastructure and space limits.
Zone Expansion
- Determine if the system scales to 6, 12, or more zones.
- Verify additional units use the same mounting approach for seamless growth.
Multi‑Room Control
- Zone capacity – Verify the maximum number of zones the system supports (e.g., up to 18 zones) and whether additional amplifiers or expansion modules are required.
- Control interfaces – Confirm that you can manage zones via the app (navigate to Settings → Zone Control), remote, wall‑mounted keypad, or centralized automation platform (e.g., Home Assistant, Crestron).
- Independent vs. synchronized playback – Replace the word “ensure” with a synonym while preserving the rest of the sentence: Make sure the UI lets you assign separate sources to each zone or enable “Sync All” for uniform audio across rooms.
- Input compatibility – Check that each zone accepts your preferred inputs (RCA, optical, AUX, Bluetooth) and that the controller can route them through RS232 or IP‑based smart‑home bridges.
Implementation steps
- Install the main controller, launch the app, and select “Add Zone.”
- Choose the desired input type, assign a zone name, and confirm.
- Test independent playback by selecting different playlists per zone, then enable “Group Play” to verify synchronization.
Source Input Variety
A robust system should support multiple input types, such as AirPlay 2, Bluetooth, AUX, Optical, USB, SD, and RS232, so you can connect phones, TVs, PCs, and legacy players without adapters.
Input Options
- Wireless – AirPlay 2, Bluetooth, DLNA; enable streaming from iOS, Android, and PC apps.
- Wired – AUX (3.5 mm), Optical (TOSLINK), USB‑A, SD card slot, RS232; cover legacy decks and high‑resolution files.
Zone Configuration
- Choose a 6‑source, 6‑zone controller if you need independent playback in each room.
- In the app, tap Sources→ *Add* → select the desired input, then assign it to a zone.
Compatibility
- Verify that the receiver lists “Spotify Connect” and “AirPlay 2” in its firmware notes.
- Check that optical input supports 48 kHz/24‑bit PCM.
Follow these steps to ensure each zone receives the correct source without extra adapters.
Speaker Placement Options
Select the mounting style that matches each room’s layout and the system’s zone architecture, then follow the steps below to configure the hardware.
Mounting Choices
- In‑wall or ceiling: preserves aesthetics, spreads sound evenly across zones, requires power access per zone.
- Tabletop: easy to position, good for temporary zones, limited acoustic integration.
- Wall‑mount: balances visual impact and acoustic performance, needs sturdy brackets.
Zone Planning****
- Identify six‑zone or multi‑room layout, assign speakers to each zone for independent or synchronized playback.
- Verify speaker compatibility; passive in‑ceiling or in‑wall models need appropriate mounting locations.
Cable Management
- Measure run lengths, use low‑loss speaker cable, route through conduit or raceway to avoid signal loss.
- Connect each speaker to the central amplifier or transmitter, label cables for future maintenance.
Follow these steps to ensure optimal placement and reliable operation.
Scalability Potential
When evaluating scalability, first identify the maximum zone count the system supports; many models expand from 6 to 18 zones, so you should verify the “Zone Capacity” setting in the controller menu under Settings → System → Zone Management.
Key Factors
- Zone Expansion – Check if the unit allows adding 6‑zone modules; each module adds six inputs/outputs, preserving per‑zone source control.
- Network Architecture – Choose Wi‑Fi linking or a centralized controller; ensure the controller supports peer‑to‑peer or daisy‑chaining to integrate additional amplifiers.
- Compatibility – Confirm RS232, app‑based, or Control4 driver support for future speakers or in‑ceiling/in‑wall installations.
Steps to Verify
- Open the controller, navigate to Settings → System → Zone Management.
- Review “Zone Capacity” and “Supported Amplifiers”.
- Test adding a new zone in the UI; note any required firmware updates.
Follow these actions to guarantee the system can grow without replacing core hardware.
Budget Considerations
– Identify your total power budget first; a 6‑zone system like the WS66i requires roughly 600 W (100 W × 6) and will cost more upfront than a 2‑zone setup that needs only 200 W.
Power & Zones
- Calculate wattage per zone; 25 W suits small rooms, 100 W handles medium spaces, 2100 W total supports large areas.
- Choose a system that matches your speaker count without overspending on amplifiers.
Streaming & Licenses
- Multi‑room kits with AirPlay or Spotify add subscription fees; factor these into annual cost.
- Verify that the transmitter (e.g., Harmony A1, Vaiyer kit) supports your preferred services.
Expandability
- Future‑proofing up to 18 zones requires extra amplifiers, wiring, and speakers; budget for incremental upgrades.
- Compare package prices: higher initial cost may lower per‑room hardware expense.
Implementation Steps
- List required zones.
- Match wattage to room size.
- Add streaming subscription fees.
- Estimate expansion costs.
- Review total upfront and long‑term expenses.
Frequently Asked Questions
How Do I Integrate Existing Smart Home Assistants With These Audio Systems?
- Open your audio system’s app, go to Settings → Integrations, select Add Device, choose Amazon Alexa or Google Assistant.
- Enable the skill/voice service, sign in with your account, then grant Control Music permission.
- In the app, map each speaker zone to a room name, set Wi‑Fi 2.4 GHz or Ethernet connection, and confirm IP address matches your router’s subnet.
- Test by saying, “Alexa, play jazz in the kitchen,” and adjust volume or source via the app’s Zone Control panel.
Can I Control Each Zone Independently via a Mobile App?
Answer
You can control each zone independently via the mobile app.
Setup
- Open the *AudioControl* app, tap Zones, select a room, adjust volume, source, and EQ.
- Use Multi‑Zone menu to assign devices (e.g., Sonos One, Denon AVR‑X) to groups, set schedules, and enable Bluetooth or Wi‑Fi streaming.
Technical details
– App communicates over 2.4 GHz/5 GHz Wi‑Fi, supports up to 16 zones, latency < 150 ms, firmware 1.3.2+.
Follow these steps, and each zone operates separately.
What Wiring Standards Are Required for Optimal Multi‑Room Performance?
- Use Category 5e or 6 Ethernet cable for wired connections, terminated in RJ‑45 connectors, supporting 100 Mbps or higher with PoE if needed.
- Run shielded twisted‑pair (STP) in high‑interference areas, otherwise unshielded (UTP) suffices.
- Keep cable runs under 100 meters per segment, employing a switch or hub for longer distances.
- Provide balanced 2‑wire speaker cable (16‑AWG) for passive zones, and low‑voltage 24 V AC for active amplifiers.
Follow these steps in the installer app: Settings → Network → Add Zone, select “Ethernet,” then confirm cable type and length.
Are There Any Latency Issues When Streaming High‑Resolution Audio?
- You’ll notice sub‑10 ms delay when streaming 24‑bit/96 kHz audio over Ethernet, because Ethernet’s IEEE 802.3 standard caps packet latency at ~2 ms per hop, plus processing time in the DAC.
- You should enable QoS on your router, prioritize RTP/RTSP packets, and set the buffer size to 256 samples in the app’s Settings → Audio → Buffer.
- You must use a dedicated 5 GHz Wi‑Fi band or Cat6a cabling to keep jitter below 1 ms, ensuring seamless multi‑room playback.
How Does the System Handle Power Outages and Automatic Recovery?
- UPS Integration: Connect the central hub to a 1500 VA UPS, configure the “Power‑Loss” menu (Settings → Power → UPS Mode) to switch to battery within 0.5 s.
- Automatic Recovery: After power returns, the hub runs a self‑test, re‑initializes each speaker (Speaker ID 1‑8) and resumes playback from the saved buffer.
- User Action: Press “Restore” on the mobile app (Home → System → Recovery) to confirm synchronization.
You’ll experience uninterrupted audio with less than a five‑second interruption.